


HELP: Sewing Machine Motor Not Running
*This post may include affiliate links, which allow me to make a small commission off your purchases. The money is earned at no additional cost to you.
Is your sewing machine motor not running? Well, there are a few problems that could be the culprit. So, let’s go thru the potential problems to find out what is wrong with your domestic sewing machine.
Tools needed to solve the problem
You will need a multimeter to check out potential issues with your machine. They are cheap an can be purchased off Amazon or at your local Walmart. Here is a link to a multimeter.
First things first…
There are a few different kinds of sewing machines. There are machines where there is:
- No power switch. The machine light comes on soon as you plug it into an outlet.
- No power switch, but a switch to operate the built in light.
- A power switch. When you turn the switch on a light comes on.
- A power switch with multiple modes. One mode only turns on a light and another mode allows for the light to operate with the motor.
- No light at all and no power switch.
Try plugging in your sewing machine and do whatever is supposed to happen in order to get your light to function. (For those of you with no light at all, this step doesn’t apply). When the light comes on, you know the sewing machine is at least receiving some sort of power.

The next step is to UNPLUG THE SEWING MACHINE and access your machine motor to check the motor brushes.
Typically, there is one plastic screw port on each side of your machine motor. When you unscrew the plastic screw ports, there is a motor brush behind there. 9 times out of 10, the motor brushes are worn or no longer coming in contact with the commutator.
If you find this is the case for your machine, replace the sewing machine motor brushes with new motor brushes slightly under the width of your motor brush port. The slightly smaller size will ensure the new motor brushes will fit inside your ports.
Unsure about the motor brush port size?
Use a caliper to measure the size of your motor brush port in millimeters. Then, order a motor brush of the correct size off Amazon. Not all motors take the same size brushes. However, most standard class 15 sewing machines take a carbon motor brush of this size.
Can’t find any brushes slightly under the size of your port?
Order brushes the same size as your port or slightly larger. For brushes too large to fit, simply use a piece of sand paper to sand the motor brushes down to the correct size.
Sometimes the brushes aren’t worn, but the motor brush cap is missing!
When the motor brush cap is missing, it always needs to be replaced. Without a motor brush cap, your motor brush won’t be able to make proper contact with the commutator.
Once your carbon motor brushes and caps are in place, it should work.
Plug your machine in and press the foot control down to see whether or not the motor is working. It should work. However, if the sewing machine motor not running still, keep reading what I have listed below to find a solution.
Is your sewing machine motor not running? Test with the multimeter.
*Note: This is the ideal thing to do when your light doesn’t power on. It is also the ideal thing to do when you don’t have a light on your sewing machine at all.
Unplug your sewing machine and pull out the multimeter. *WARNING: MAKE SURE YOUR MACHINE IS UNPLUGGED WITH NO POWER FLOWING TO YOUR MACHINE AT ALL.
With the machine and the foot control unplugged, you are going to test for continuity. This simply means you are going to make sure there is a complete path of current flow. When there is no continuity, it means there is a blown fuse, bad solder joint, or faulty wiring.
How to use the multimeter.
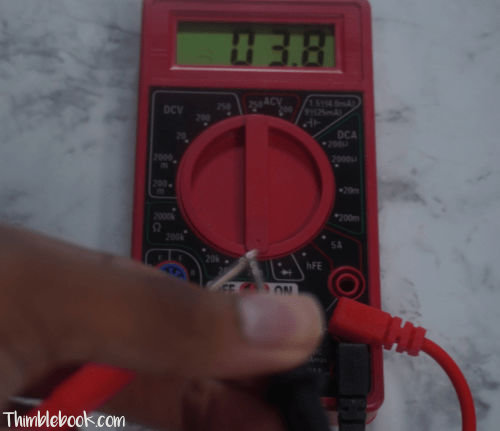
Plug the black probe into the COM port of your multimeter. Then, plug the red probe into the VΩmA port. Resistance is measured in ohms, indicated by the symbol Ω. So, turn the dial to the lowest resistance mode under Ω.
First test the multimeter itself by touching the probes together. The probes should read zero for continuity. Or, it should read close to zero. Mine reads 03.8. Now, you are prepared to test your foot control.
To test your foot control…
…place the red and black probes onto one side of your power plug. It should read zero or close to zero for continuity. Rinse and repeat this process on the other side of your power plug. If you get a reading of 1 or -1, it means there is no continuity.
There is no continuity 🙁
Let’s go back to the statement I made a few paragraphs before. When there is no continuity, it means there is a blown fuse, bad solder joint, or faulty wiring. Most times, its going to be bad wiring on your foot control. However, there are instances where it isn’t the wiring. Either way, let’s go thru all 3 reasons why there is a continuity issue.
Faulty wiring
Is your wiring cracked or looking bad. If so, you likely need new wiring. Wires can be replaced by making a simple trip to the hardware store and purchasing new wiring. However, if you don’t have certifications or strong knowledge of electrical wiring, I highly recommend buying a brand new foot control. I recommend buying a new foot control because it is a lot cheaper than electrocuting yourself or causing a house fire!
When your wiring on the foot control is shot, there is usually going to be an issue with wires leading to your motor too. We will talk about this later. But for right now, let’s continue on with the next potential issue concerning the foot control.

Blown fuse or Capacitor
You don’t have to worry about any fuses if you have a sewing machine made before 1980! However, if you’ve got sewing machine made after 1980, there is a very good chance you’ve got an electronic foot control with lots of fuses inside. Most of these foot controls say (electronic) right on the label. However, when there is no label, it is very easy to tell by simply opening up the foot control to expose aboard with lots of little fuses inside.
The fuses are soldered onto the board at one or two solder points. Its really easy to tell where they soldered each component onto the board. So, simply place your multimeter probes directly to the solder points to check readings on each fuse.
On my Bernina 1010, I had a busted fuse and ended up purchasing a brand new foot control because a new fuse wasn’t available for purchase. The new Bernina foot control wasn’t cheap and in the $100 price range as of 2023.
Bad solder joint
On a lot of vintage sewing machines I find out in the wild, the solder has worn off at the connectors. To fix this problem, you would need to use a solder tool to reconnect the wire to its connector. Then, you would need to put the wires back in the places where you found them. Also, it is common to find where new wires have been soldered onto the original wiring.
Over time, the solder between the old and new wires wears and there is lost continuity. To fix this problem, you need to trim the wires, twist them back together, and add new solder to reestablish a connection. This process takes a little knowledge of soldering and electrical wiring. So, don’t try this if you don’t have the knowledge. But, find a friend, family member, or sewing machine repair person who knows how to fix it for you.
Other potential problems with the foot control
First let’s talk about the other 2 types of foot controllers out there. You’ve got:

Variable resistance foot controls:
These have the little coils inside. The more resistance on the coils, the faster your sewing machine goes. With no resistance on the coils, the foot control won’t work. Hence, you’ll find your sewing machine motor not running. Typically, you can replace the coils and/or the little spring that creates resistance. But, most people don’t bother with doing repairs because these foot controls are metal and not grounded. They can be quite dangerous if not working properly. Trust me – I know from a very bad experience where my sewing room was set on fire!
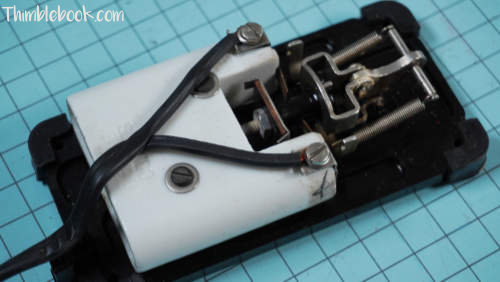
Carbon pile rheostat foot controls:
These foot controls came in a number of different configurations including button style and clam shell. These foot controls have a ceramic box behind the outside cover. This ceramic box has lots of little carbon disks inside it. Whenever the foot control is pressed, a little plunger goes into the ceramic box, pushes down on the disks, and causes the machine to go. In other words, sewing machine speed is determine by how hard the disks are pressed.
Occasionally, the little nut that holds the plunger in place gets loose. This causes the plunger to no longer reach the ceramic box. Hence you’ll find your foot control not working and the sewing machine motor not running. To fix this problem, you just need to tighten the nut.
Also, the disks can become dirty over time. To fix this issue, you’ll need to remove the disks and clean them. However, be super careful with removing disks because they can easily be broken!!!
By the way, did you drop your foot control? If so, the disks can be cracked or broken. These disks are not easily replaceable. Hence, you will need to buy a brand new foot control if the disks are broken.

Nothing is wrong with my foot control. It’s the motor:-(
Needs new motor brushes :
Simply replace them.
Communicator is dirty:
You’ll need to open up the motor and gently clean the communicator with a piece of light sand paper. 1000 grit should be sufficient. You don’t want to scratch the communicator. However, you do want to get rid of any soot or dirt that could be causing the motor to not work properly.
Copper wire bundle/coils are dirty:
Spray electronic cleaner on the coils and wipe them clean with a microfiber cloth.
Grease ports need new grease:
On vintage sewing machines with a potted motor, you must use grease inside the motor in order to keep it functioning. If the grease has hardened , you will need to remove the worm gear and really clean out the entire motor until it sparkles. Then, you will need to add new grease onto the worm gear and inside the grease ports. Do not use any synthetic grease inside the motor as it will not allow the motor to function properly. The current Singer motor grease isn’t the correct viscosity for vintage sewing machines either. Therefore, you will need to use an alternative grease. Sew retro grease is expensive, but it works. There are a number of other greases experts use. However, I stick to what I know for now.
Faulty wiring:
*If you don’t know how to solder or work with wiring, please consult with an expert.
Occasionally, the wiring will come away from the solder point on your motor and need to be re-attached. Also, there are instances where motor wiring is simple worn out. For this, you will need to cut as far away from the actual motor housing as possible to preserve as much of the original wire as you can. Add new shrink tubing onto the old wires and push it out of the way temporarily. Then, twist new wiring onto the old and solder it all together. Now, push the new shrink tubing over the exposed wires and use a heat gun to adhere it to your wires as a protective coating. Done!
Motor is completely shot and needs to be rewound.
This is usually not the case because most vintage motors are made to last a very long time. However, if your motor is 100% not salvageable, you will need to purchase a brand new motor for your sewing machine. Thus far, I’ve only had one motor that needed to be replaced on a machine. Here is a link to a motor I like to use. I hope this article was helped you figure out why you’ve got a sewing machine motor not running.
Other Helpful Articles
The Insider’s Guide to Sewing Machine Repair Part I: Electrical Cords
The Insider’s Guide to Sewing Machine Repair Part II: Foot Pedal Repair
No Comments