


Kenmore 158.1941: Parts List + Everything You Need to Know
*This post may include affiliate links, which allow me to make a small commission off your purchases. The money is earned at no additional cost to you.
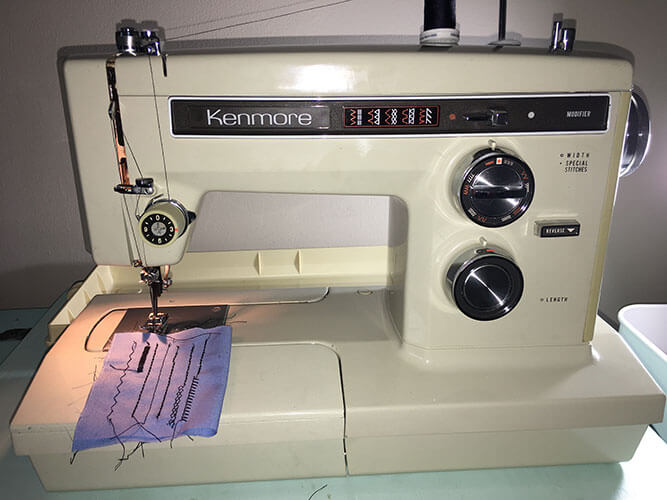
I was able to acquire Kenmore 158.1941 sewing machine for a reasonable price off Craigslist. In short, I will give you everything I know about Kenmore 158.1941 in hopes it will help you find replacement parts and/or discover interesting details about this beauty.
First Things First
Maruzen Sewing Machine Company started production of the 158.1941 in 1975. It produced two models of this machine 158.19410 and 158.19411. In 1977, my version 158.19412 was born.
General Specs
Kenmore 19412 has 5 standard and 5 stretch stitches for sewing knit materials. Most importantly, this machine has an oscillating hook, centered needle position, and a double belted 1.0amp motor. Due to the double belt situation, there is much less gear slippage. This means you can sew thru thick material without having to “help” the hand wheel.
In other news, the Kenmore takes super high shank feet.
I like super high shank feet because they allow you to see underneath the needle better when sewing. However, there are serious problems with using super high shank feet in the 21st century. Don’t worry! I’ll get to discussing those problems a little bit later.

Diving Deeper into Kenmore 158.1941
Taking apart the Kenmore is super easy! However, I would recommend using a different method than the manual suggests for removing the top lid. The manual says to place a screwdriver underneath to pop the lid. At the same time, there are a lot of sensitive parts underneath the hood. Instead, I’d recommend placing your screw driver next to the ledge pictured and slide up to keep yourself from doing any damage.

Super Web gear grease.
Oil & Grease
My Kenmore was bone dry and hadn’t been oiled in ages. I oiled the machine with Zoom Spout and replaced gummy gear grease with Super Web, which is a white synthetic grease used on bike bearings. It works really well on sewing machine restorations and I’ve never had a problem with it. The other great grease I use is Tri Flow Clear Synthetic Grease, which is typically much harder to find at stores in my local area.
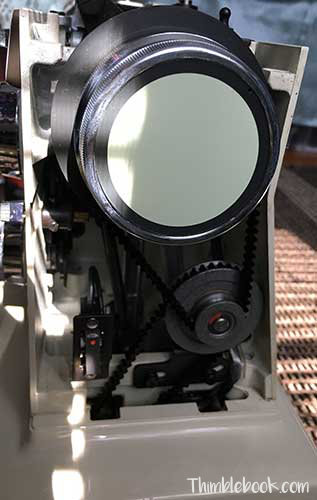
Belts & Brushes
Inside my machine, the motor belts were in mint condition and the motor brushes didn’t need replacing. But, here are links to the motor belts and brushes just in case you find yourself needing a replacement.
- Upper Motor Belt (Belt will measure about 13 3/4″ in circumference or about 13 3/8″ in a straight line)
- Lower Motor Belt (Belt will measure about 13 5/8″ in circumference or about 13 1/4″ in a straight line)
- Motor Brushes (standard sewing machine brushes)
Foot Pedal Option
When I buy a vintage sewing machine, 90% of the time I end up replacing the foot pedal. This foot pedal was in good condition except for one crack on the side. For now, I have decided to make due with what I have. But, in the future, I want to buy:

Needle Plates
About 20% of the time, the needle plate is damage or missing. Fortunately, I don’t have damaged or missing needle plates. However, I may purchase an extra zigzag plate just in case I scratch the surface because nobody knows how long after market parts will be available.
Its Funny…
The manual never mentions what tire the machine takes. Also, you may need new spool pins and felt. This machine takes:
- Universal bobbin winder tire #15287 (Tire Thickness 9/32″, Inside Diameter 9/16″, Outside Diameter – 1-1/8″)
- Spool Pin
- Spool Pin Felt
The light bulb is just a standard one.
Likes about Kenmore 158.1941
Design
I love so many things about this machine and find myself using it a lot. Style wise, I love the very settle greenish tint to the cream paint job. It matches super well with any décor. Plus, the black/white/clear sewing machine color scheme, coupled with an angular body style, gives off strong mid-century modern vibes.
I also love how easy it is to get into the sewing machine. It lets me know the company was thinking about the end consumer. This is refreshing given how many other companies made their machines non-serviceable.

Plastic side cover to the machine.
Build Quality
The double belted motor makes sewing thru heavy fabrics a breeze. I’m not sure the exact speed, but it is fast. This machine also has 99% metal parts inside and has a very nice sturdy build. In all, plastic is comprised of secondary parts which are the:
- Side plate cover (the cover over the hand wheel area)
- Motor belt gear (a part that rarely gets touched and could be fixed in the rare instance it ever broke.)
- Bottom cover
Minimal plastic isn’t an issue aside from some yellowing. Easily, any yellowing can be fixed with Salon Care 40 Volume Crème Developer.
Built-in Stitches
I appreciate the built-in stitches included in this sewing machine. I hate design cams and really enjoy being able to sew stretch stitches. There are not many stitches, but who needs more than 5 regular and 5 stretch?

The gentle slope doesn’t seem like much, but it does make a big difference.
Bed
There is a slight angle to the machine bed that makes fabric float over the surface easily. I love this feature so much I couldn’t see myself getting another domestic machine without it.
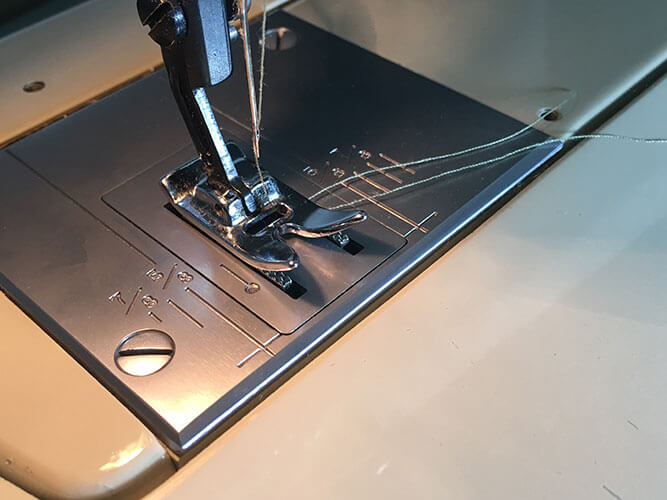
Needle plate has markings at both ends.
Needle Plate
Once I started sewing, I remembered there are markings and measurements on both sides of the needle plate. This makes measuring seams effortless!
Also, the needle plate can be popped off and replaced with a straight stitch plate. It requires no screws and only takes a few seconds to change. I love this feature because I can easily switch plates when I don’t want fabric to get sucked down into the needle plate.
Bobbin Case & Bobbins
The original Kenmore brand bobbin case has a window for easily seeing how much thread is left inside the bobbin. It allows you to have the stitch quality of an oscillating hook sewing machine without the full disadvantage of not being able to see how much thread is left in the case. At the same time, a standard class 15 bobbin case will fit inside of this machine if you cannot find a Kenmore replacement.
While I do have another machine that uses class 15 metal bobbins, I found cheap aftermarket bobbins didn’t work well on the Kenmore. So, I opted to replace my ultra cheap bobbins with a brand made of a better quality.

Sewing machine case
Kenmore 158.1941 comes with a hard cover. It is something modern sewing machine users can appreciate because most modern-day machines don’t come with a cover. Even though the sewing machine comes with a hard carrying case, I tend to use my Tutto sewing machine trolley because the Kenmore is quite heavy.

Feed Dog Drop
The feed dog drop button is a big ol’ button and I like it. I like being able to drop feed dogs without having to search for super tiny lever in the back of my machine.
Bobbin Winding
Kenmore 158.1941 hand wheel pops out to disengage the fly wheel. This is much better than hand wheels that disengage via the turn method. I wish all hand wheels popped out to disengage as I often get tired of asking others turn the wheel when it’s too tight to disengage.
Dislikes about Kenmore 158.1941
No LMR
There are no left, middle, or right needle positions. A middle needle position means you’ve got to get creative with making stitches in certain areas. Personally, I’ve found myself sewing a lot more basting stitches before making the permanent stitch because of this issue.

1 More Obstacle
In order to gain access to the bobbin case, you must remove the top cover and open a small door. These are two steps I hate taking whenever I run out of thread. It’s no big deal, just an annoyance.

The Accessories Box Sucks
The machine came with 5 presser feet, a needle threader, screw drivers, and a cog buttonhole attachment. The cog buttonhole attachment also included 2 different plastic buttonhole cards. Shockingly, all of this stuff was crammed into one small accessory box. Yes, the manual shows this is how the machine came!
5 feet isn’t quite good enough
Kenmore 158.19412 has an over edge stitch, but an over edge foot isn’t included. The over edge foot was an additional purchase. This is not acceptable because all the sewing machines I’ve ever encountered included feet for functions the machine performed.
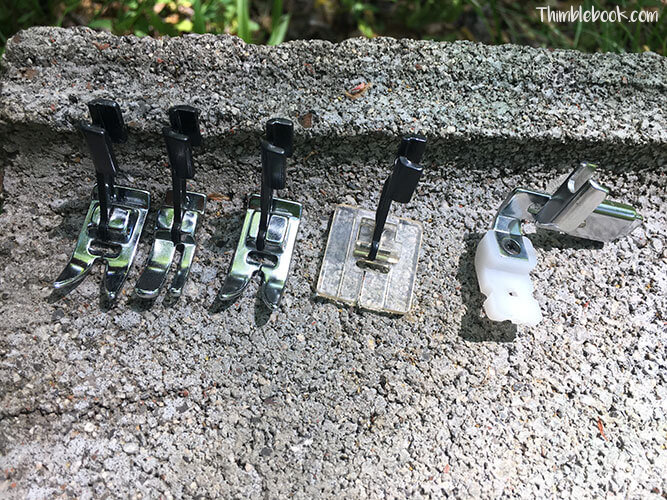
Super high shank feet are limited, expensive, and not of great quality 🙁
Kenmore produced a very limited variety of presser feet in comparison to Singer who offered many different slant shank feet for various sewing tasks. This means you’re out of luck if you want to buy a super high shank Teflon foot for stitching vinyl. When you do find a super high shank foot for sale, its is used and expensive. As of 2024, you’ll spend anywhere from $20-$30. Also, many Kenmore feet are plastic. After years of use, they don’t hold up good.
One small time remedy makes things a little better.
Aftermarket sellers have tried to remedy these problems by offering a super high shank to low shank adapter. The low shank adapter works, but you’ll still need low shank presser feet or a secondary adapter for converting low shank to snap on. I don’t know about you, but I’m not a fan of using multiple adapters together.
It’s problematic to need adapters, but I don’t find the adapter issue to be the worse part of the presser feet problem. Whenever you buy presser feet, you want to make sure they match the width of your feed dogs. The biggest issue about getting aftermarket feet for Kenmore 158.1941 is the maximum stitch width of 4mm. 4mm is a problem because most machines today are either 5mm, 7mm, or 9mm.
Here are the links to a few super high shank aftermarket presser feet options:
- 12 snap on feet + 2 adapters (1 is for converting to low shank & the other converts low shank to snap on)
- Order Super high shank to low shank adapter + low shank to snap on adapter + snap on presser feet kit.( I ordered the 32 piece kit and 10 out of the 32 didn’t fit. Others, worked but only with a size 11 or 14 needle in the sewing machine).
- Get the Super high shank to low shank adapter + Vintage Kenmore sew by color kit

As if the presser foot problem couldn’t get worse, there is one more issue!
Super high shank presser foot system doesn’t have a bar on the right hand side. However, you need this bar for using a modern-day darning foot or walking foot. Someone is selling an aftermarket bar. However, it isn’t easy to find a compatible walking foot or darning foot for this sewing machine.

This is Brother SE625 with the bar all modern machines have for using a darning foot or even feed foot. You need this bar attachment too.
Here is a link to the aftermarket bar for attaching a darning foot or walking foot.:

Somehow, I think Kenmore cut corners on accessories so they could include a “revolutionary” buttonhole attachment.
Kenmore buttonhole attachment would have been a wonderful feature to have on a sewing machine back in the 70’s, allowing users to make rounded or keyhole buttonholes. In the 21st century, however, the cog gear buttonhole is a horrible monstrosity!

How the Kenmore buttonhole contraption works
In order to use the Kenmore 158.1941 buttonhole function, you have to drop the feed dogs and put the cog gear onto the machine bed. Then, you have to run one of the buttonhole cards thru this strange contraption and screw said contraption onto the machine bed. After doing all this, you have to put on the buttonhole foot and make sure the contraption sits 100% perfect over the cog gear.

I used black thread for the bobbin so you could get a better look at overall performance. Most of the buttonholes look nice. But, the cog gear got stuck and screwed up a few of them.
Verdict about the monster buttonhole maker
The contraption then makes beautiful buttonholes, but it is hit or miss. I say hit or miss because the cog gear often gets stuck in the curve of the buttonhole card and messes up the stitch.
I hate the cog buttonhole function because it:
- Takes so many steps to make one single buttonhole.
- Doesn’t always work right.
No thanks! I’ll make manual buttonholes or just use my computerized Brother SE625 for doing more intricate designs.
Overall
I love the Kenmore 158.19412 and can never see myself selling it. It is a great machine and such a pity people sell and/or retire their machines because of the issue with super high shank presser feet. Kenmore 158.19412 is easy to maintain and works very well for sewing woven and knit fabrics alike. Better yet, it isn’t a pretend heavy duty machine. Unlike sewing machines found at Walmart, this Kenmore 158.1941 is made from 99% metal and sure to last many decades to come.
I’ve listed all of the Kenmore 158.19412 parts I could find. Perhaps this list will make it much easier for you to find the parts and/or accessories you need.
Kenmore exposed window bobbin case #60404
Straight stitch plate (Part #38296)
Zigzag stitch plate (Part #40541)
Motor Brushes (standard sewing machine brushes)
Super high shank to low shank adapter
Vintage Kenmore sew by color kit
72 piece snap on presser feet kit
Originally posted ay 2021 & Last Updated June 2025
Other Helpful Articles
My Craigslist Bernina 1010: Restoration to Review
60 Comments
Leave a response
As a Kenmore lover and collector, I envy you. I’ve been looking for a 1941 in reasonable condition and the right price for a while now. It’s such a functional machine! I have several Kennies that I love – some I haven’t used yet as I haven’t finished reconditioning them. In particular, I have a duplicate of the 158-14001 that was a gift when I graduated high school in 1969. It was wonderful as I’d never used a zig-zag machine before. Your comment about the gear-driven buttonholer gave me quite a chuckle because you’re right!! It was clunky as hell. I remember having to do a LOT of fiddling with upper and lower tension to get the desired results. I never had the problem with it getting stuck on the curve however, maybe because it was an earlier model (’69-’70) and it didn’t use that rectangular auxiliary piece, only the “ice cream cone” flat attachment. And it WAS wonderful back then; innovative and easier than some other machines my girlfriends had. Nowadays, my 14001 sits next my modern Brother VQ3000 electronic beast so I have backup when the Brother goes in for routine maintenance. So like you, I go to the Brother machine to make buttonholes because it’s easy and works beautifully. Still, the 1941 is a great machine and I have a feeling (don’t hold me to this) that it was designed by Charles Harrison, who designed so many marvelous Kennies for Sears. Having these superbly engineered and precisely built Japanese machines around gives me a wonderful feeling of security. Sewing is my retirement avocation and I’d go crazy if I didn’t have such dependable (and self-serviceable) backup machines around.
Thanks for this delightful article.
p.s. I agree with you about Zoom Spout oil and Tri-Flow clear grease – I use them in all my vintage machines. And I find that Tri-Flow is rather good at helping to get out the last dregs from a gear case which had been full of old rubbery grease. Don’t know why, but it works for me. Great stuff.
😉
Thank you for your post on this wonderful kenmore. After my early 1980s kenmore started malfunctioning I found pungo livings webpage on this same machine and began my search. My 80s kenmore had a nylon gear and electronics for the stitching. It also came with a similar buttonhole system and a built in buttonhole feature. The built in feature was used most of the time, something the 1941 is lacking. However, the 1941 is a much stronger machine than my machine 80s machine. I cannot complain about my 80s kenmore as it served me well and was a gift from my father. Now that I acquired the 1941 in the last year to sew masks for my kids and family it is a joy to sew on. I too have been searching for presser feet and will look into your recommendations. The 1941 is a keeper for sure.
Thanks for responding to the posts. It is awesome that your dad got you a 1980’s Kenmore :-). The 1941 is indeed a good replacement. Happy sewing!
Thanks for posting, a lot of good information here! I just had my Sears Kenmore 158.17810 lose the ability to lock my presser foot and I cannot find a tutorial as to how to adjust it. The pressure foot lock has loosened up and there seems to be a trick as to how to tighten it but I haven’t figured it out. Do you know of any specific site that would provide instructions for this or can you provide some insight? Thank you so much anything, you can provide for me would be greatly appreciated it.
The presser foot lock comes down to loosen (for adding a new foot) and up to tighten (for holding the new foot in place). To fix your problem, lift the presser foot lock up to where you would like to sit in its raised/tightened position. Then, use a tool (like a ratcheting wrench and a metric bit or a pair of pliers) to tighten the hex screw found on the right side of the presser foot lock. Once the hex screw is tight, hold it with your fingers to make sure it doesn’t loosen back up. At the same time, you will need to use a flat head screw driver to tighten the screw on the left side of the presser foot lock enough to hold a new presser foot in place. Lower the presser foot bar and test fit a presser foot to see if it stays in place when you raise the lock. You’ll have to make adjustments in order to get the right fit. It usually takes about 20 minutes to get it adjusted just right. Please let me know if you have anymore questions. Thanks!
Thank you for this wonderful article! My dearly departed MIL gave me my 1941 model as a gift in the 1970s and it’s still going strong. Your article convinced me to hang onto it and not replace it. The only thing I need is a walking foot, and I can’t find one😕
I may be wrong, but I looks like you can purchase the low shank adapter and simply buy a low shank walking foot to fit.
Hello, thank you so much for this article. I have a Kenmore 158.1595180 and I have the problem of fabric that get sucked down into the needle plate. I want to know if the inserts would work on my machine. It looks like you have the basic needle plate plus an insert. Could you show me the basic needle plate without the insert so I can make sure mine is exactly the same, meaning I could buy the insert and it would fit. Thank you again.
Yes, I will send it to your personal email. Happy Sewing!
I have the Kenmore 158.19410 and need a compatible foot for bias tape. Any suggestions?
I cannot remember if it was 19410 or 19413 with a low shank configuration.In any case, if your machine is low shank, I recommend getting the Dreamstitch bias binder foot off Amazon. However, if your machine is a super high shank like mine, you will need to purchase the low shank adapter (found in this blog article) in order to use the Dreamstitch bias binder foot on your machine. Happy Sewing!
I have this exact model. 158.1941. I am missing the top plate on the machine and do you know where I can find another top plate to purchase? Thanks
You’ll have to keep searching eBay for a “for parts” Kenmore. The proper search term is “Kenmore sewing machine” as a more specific search doesn’t yield good results. Unfortunately, you’ll have to go thru the tedious process of combing thru all the pages to find your part. I found one link to your machine here https://shopgoodwill.com/item/137817399. The costs will be $50+ for an entire machine, which you can get the part from. Thanks for visiting the blog.
I have a 1931 which is very similar. I had to take the quick release presser foot lever off as someone had put it on backwards, but I can’t get it to work. Is that a nut I see between the lever and the black screw that comes from the left side? If so, I’m missing that. Please let me know. Thanks!
On mine, there is a screw on the left side. The right side, however, does have a nut that attaches to hold the presser foot lever in place. Thanks for visiting the blog and please let me know if you have any further questions.
Have two of this model and the dial for stitch width and stitch style only turn together, not separately as they should. Any ideas?
Do you have 158.19412 (as I do) or do you have 19411 or 19413???
Enjoyed reading all the comments on this site. I have a Kenmore 19410 that I bought new in 1975. It is a very good machine and I have used it often. I have a problem raising and lowering the feed dogs. I can move the button up and down but the feed dogs do not move. I can manually raise and lower the feed dogs. Is there a way to get this part to move again.
Thank you for visiting the website. My response comes in the form of two YouTube clips. This one shows you the bullet that usually gets seized up on older machines https://www.youtube.com/watch?v=P5lxPfmpLYM. The other just shows the inner workings of the feed dogs inside your Kenmore machine https://www.youtube.com/watch?v=xxTLPFEZSgw. Between these two videos, you can hopefully get your feed dogs moving again.
Hi, I’ve recently inherited a 1941 kenmore that originally belonged to my grandmother. My mom has kept it in good shape over the years, and I am using it to teach myself how to quilt. Are there any videos or manuals that you would recommend for oiling and maintenance? Also, would the darning foot be a good idea to purchase for free quilting? A lot of the original accessories were misplaced, so I only have the basic foot. Thank you for the article, it was very helpful!
I have a Youtube video on how to service sewing machines (https://www.youtube.com/watch?v=jZ1ZK_kk98U&t=93s). It’s pretty easy to open the top part of this machine. But, the bottom is a little harder. Once you take off the bottom screws, there is a tab near the bobbin case that must be released in order for the bottom plastic to come off. As for accessories, I would recommend getting the long attachment screw so you can purchase a darning foot for this machine. The 32 pack of presser feet, featured in the article, does come with a very basic darning foot. However, you will need the adapter in order to use all the other presser feet. Thanks for reading.
I just got this machine and agree with most of what you said. However, I have a few different perspectives. First, I wouldn’t say it is exactly “easy” to get inside this machine. I opened mine up last night and removed – I dunno – maybe a dozen screws to get in there. It is also a little annoying that you have to unscrew the needle plate to clean around the feed dogs, and even use a screwdriver to replace the needle! Also, on the contrary, I find this machine to be rather slow. Mine is in top condition – clean and oiled and VERY well maintained – but chugs along at mayb 800 spm. I have machines that stitch 1200-1500 spm, so to me that is slow. But the power behind the stitches on this machine is what stands out. I’m good with slow in the case where I need machine that can really punch through multiple thick layers the way this one does. Oh, and as for that post that you screw onto the needle bar, it does come with the even feed foot (if you can find one in SHS!) All in all a great machine, and this was a good post with a lot of links to parts which is helpful.
My Reverse lever just “popped” the other day. Now it will only sew in reverse. I went into one local Sewing Machine Store in Albuquerque, but they said that my Kenmore 1941 is not fixable as you/they cannot get the parts. I am going to go into the other Sewing Machine Store this weekend to see what they say. Your thoughts?
The only way to get the reverse fixed will be to either get someone to fabricate you a new part or purchase another identical 1941 online for parts. The easiest way to find another 1941 is to check the goodwill shop online website, Craigslist, or FB marketplace. I hope you get the issue fixed soon.
Yes you can get the feed dogs to lower. It’s an easy but tedious fix. Oil has dried out and glued the parts together. You’ll have to put a drop or two of penetrating oil into the pivot point which is to the right of the hook assembly near the back of the machine and work the mechanism back and forth by hand a few hundred times. If you’re lucky, it’s only the “bullet” that’s glued into the barrel next to the hook. Some penetrating oil on it and work it back and forth.
I have a 1941 that I bought in 1978 and am pulling it out nowadays to sew handbags. My quick release for presser feet just flips around and doesn’t do anything. Is it in wrong maybe? Do you have a pic or something so I can figure out how to adjust that? Thanks.
On the left side of the quick release, there is a flat head screw. On the opposite end, there is a HEX washer. You’ll need to use a ratchet to tighten the hex screw and also use a flat head screw driver to tighten up the screw on the opposite side. It will take a little bit of trial and error to get the screws tightened the right amount for your pressure feet to fit into the quick release properly. I will send you a photo to show what I am talking about. Take care.
Does anyone know where i can get a replacement switch for my model 1941, my patents bought this for me in 1978 my heart is broke that the switch broke.
Please don’t be heartbroken! It can be fixed so long as you have YouTube and few handy skills. You’ll need to do it yourself a many shops won’t go to much trouble to fix it. Is it just the button that is broken or does the entire switch mechanism no longer function?
If the entire mechanism no longer works, you’ll need to expose its wiring or find the exposed end of the switch wiring. Get a multi-meter to test which part is no longer functioning. Then, go the hardware store and buy replacement wiring. They should be able to help you find wiring either in store or online.(Just don’t tell them it’s from a sewing machine as it intimidates most).
If it is just the button itself that is cracked or broken, you will need to use mold star 30 to make a mold for a new part and then purchase the material to pour into the mold.The very last alternative is to go on FB marketplace or Craigslist and buy another 1941 just for parts. I hope this helped. And, please let me know if there is anything else I can do to assist.
how can I get info on whether this machine (or any Kenmore) is 1 or 1.2 mp?
Kenmore 158.1941 has a 1AMP motor. It isn’t easy to find out details about sewing machine parts because manufacturers aren’t forthcoming and owners very seldom open up their own machines. However, sometimes you can find information on older machines in forums where people do restorations.
Hi there, my Mother owns this machine and loves it. Looks and works as well as it did the day she got it. She wants to mount it in a sewing table but we can’t find the original mounting screws. Does anyone know what size they are? I believe there are two needed. Any assistance/suggestions are appreciated. Happy sewing
Yes, you are looking for head hinge screws. If you have one of those early 20th century Singer sewing machines, you’ll have to go onto eBay to find screws. However, pretty much all other vintage sewing machines take one standard set of screws. Here is a link to the head hinge screws : https://www.sewingpartsonline.com/head-hinge-screw-sewing-machine-50380.aspx
I have a model 19412 Kenmore sewing machine. Not sure how to thread & operate it. Is there a tutorial? Please and thanks.
I’ll make note to try doing a detailed Kenmore 19412 video. In the meantime, you can get by with learning how to thread the machine with the manual which can be found here https://www.searspartsdirect.com/manual/1f2ynb0kab-000582/kenmore-15819412-mechanical-sewing-machine-parts
I have a Model 1941 (my first appliance purchase!). I’m having a problem with thread jams. I have oiled it, taken apart the top tension and cleaned the discs. Seems to be a problem with the bobbin and bobbin compartment. Do you have a link or reference about opening up the bottom and oiling/cleaning the bobbin chassis?
(BTW, I love the very clunky buttonhole device!)
Thanks in advance for your help.
There are screws on the bottom of the sewing machine that you must unscrew. Then, there is a very small plastic tab that must be released in order to remove the bottom cover. The plastic tab easily comes off once the bobbin case door is opened. After that, you have full access to the entire bottom of the sewing machine so you can see what is going on. There may be thread jammed underneath there. If there isn’t a thread jam, you might want to try replacing the bobbin case with a brand new one as these can sometimes be the culprit.
Hello! Lovely site and machine. Does this model able to use a monogrammer? If so which kind?
I’ve heard there was a monogram attachment that was sold separately for this sewing machine model. However, I don’t have it and have never seen one out in the wild.
I canNOT EEEEVEN tell you how much I appreciate this post. I did a search for Kenmore 158.19412 and came across your very detailed, and incredibly helpful blog post.
I bought my machine recently, from someone who was just trying to offload it before a move. Got it for $55 bucks and it’s in GREAT condition.
In your sections above, “1 More Obstacle” and “The Accessories Box Sucks” I’m missing the accessories box and the top cover… have any ideas where I can replace them?
If you type in “Kenmore accessory box” in google one pops up for sale in Etsy. Also, if you go over to the shopping tab, you’ll see another one for sale in eBay (as of 6/29/23). However, it’s going to be a little harder to find the top cover. I usually just go to eBay and search (Kenmore sewing machine Parts) and thumb thru pages and pages to find a matching piece because most folks don’t list the exact model number. I hope you are able to find all the parts. 🙂
What’s the screw part called that attaches the high shank or adapters for the presser feet? Mine just sheared off when I was loosening the width for my other presser foot adapter.
I think you must be asking about the thumb screw, but I could be wrong. The thumb screws are pretty easy to get for the Kenmore machines so you are in luck. If this isn’t what you mean, perhaps, you could shoot me an email and I’ll try to help. Thanks for reading the blog.
I’m new to the Kenmore machines so I loved finding your post. Thank you for providing such comprehensive information. It makes me fall in love with my machines even more.
Thanks for reading 🙂
hi! my fiance and I recently bought a house and the previous owner had left almost everything here. she kept it all in excellent condition too. I found this sewing machine in immaculate condition in the basement and it seems to have all extra accessories and parts to it still bagged. it also had the manual which looks like it was printed yesterday. the issue is I don’t sew and I have no idea where or for how much to see it for. since you’re the expert, is there any advice you could throw my way? it would be greatly appreciated. I have pictures and a video of the machine in all its glory if you need. thanks again.
If you don’t already have a sewing machine, my best advice would be to keep it because the sewing machine is an emergency preparedness item. Prices are continually going up and the dollar is loosing value. Also, if we get another lock down, the fragile supply chain will make it difficult to get new things. In that case, you would need to repair items rather than buy. The manual shows everything you need to know about how to make a straight stitch. Its really all you need to know. But, if you insist on getting rid of it, find the model number and look it up on Ebay to see how much it is selling for. Then, list it on Craiglist and Facebook Marketplace.
Would you be so kind, please, to let me know where I can find a Hemmer Presser for Kenmore Sewing Machine Model 158.1941 .
Many thanks!
Unfortunately, I have never found one of these in super high shank. For this reason, I use the presser foot adapter and a low shank foot.
I acquired this machine at an estate sale. motor runs but will not turn anything else. it was dry as a bone. I have oiled and greased everything. I can turn hand wheel and make everything turn but barley. seems to be locked up behind hand wheel. any suggestions.
You need gear grease along the cam stack. Grease it until it feels like there is too much grease. I am releasing a video on my YT channel about this very issue. The video will be titled “Don’t let her sit.”
This was a fantastic read, thank you! This was my first sewing machine. I inherited it from my MIL in 1992. I’m curious if you could advise which 3/4″ single fold binder would be compatible for with this machine.
I am currently working on doing research on the presser feet as they are a bit of a challenge.
Where can I find an easy way to adjust timing?
Timing adjustments are relatively the same across models. I would recommend this video from Randy the Sewing Machine guy on YT
https://youtu.be/kFWtND4wOPM?si=8vyZxSbFdyLxrKdf.
Wow, I’m so glad someone has made such an informative post about this sewing machine! I was handed down one from my mother, and I’ve always liked sewing with it. That said, there’s one problem that I’m wondering if you might have any knowledge about. The machine runs almost perfectly fine, but only the straight stitch works. I know it’s been serviced a couple of times, but the last time it was they weren’t able to fix the issue. I can turn the knobs to any of the other stitches, but it will still only do a straight stitch. Any advice you might have would be greatly appreciated. Thanks!
Apologies for the very late response. I didn’t know how to respond via text. So, I’ve created 2 YouTube shorts explaining potential causes of the issue. Here is a link to part I of the short. There is also a link within the 1st short that will lead you to the second one: https://youtube.com/shorts/CL7QZo_awgk
Great article. I recently purchased a 158.19412 from ebay and unfortunately it was slightly damaged in shipment. The only damage is to the upper thread guide. I can not find a replacement. Any help would be appreciated.
There is a website called vintagesingerparts.com. They have a few Kenmore upper thread guides for sale. If you don’t have any luck there, I would try going to shopgoodwill online and looking for a similar model Kenmore. At times you can get a non working one under $20 to use for parts. Welcome to the 19412 club 🙂