


What to Do About Thread Loops Under Fabric
*This post may include affiliate links, which allow me to make a small commission off your purchases. The money is earned at no additional cost to you.
When you’ve got thread loops under fabric, you’ve must use the process of elimination to get answers. Below, I’ve outlined the entire process for determining why you’ve got thread loops under your fabric. You’ll be very surprise to discover the answer is often quite elementary.
It sounds stupid. But, try threading your sewing machine again.
When your sewing machine is in motion, the top thread will sometimes shift out of place and cause a problem with the thread tension. Or, you could have gotten too confident and missed an important step when threading up your machine.
Either way, re-threading your machine is the best way to make sure this isn’t the cause of the bird nest underneath your fabric.

Thread loops under fabric, still? Change your needle.
Change the needle because thread tension problems can be caused by the smallest part on your machine, the needle. We cannot forget different fabrics require different needles and must be changed frequently. I’ve been lazing with changing needles myself. Sewing machines and fabric, however, can be very unforgiving with this tiny mistake.
The thread loops under fabric problem hasn’t been solved yet? Check your top thread tension.
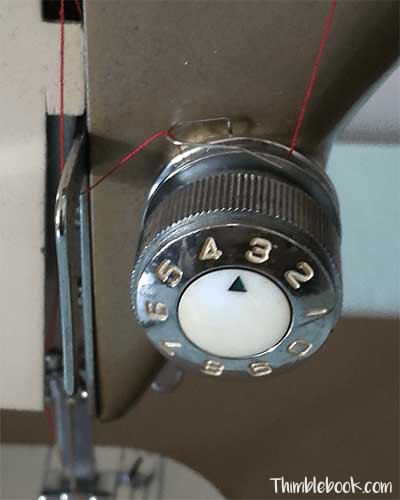
The directions to this step are two-fold. First, you’ll want to adjust your top tension. Top thread tension, on a classic class 15 Japanese sewing machine, is controlled by a screw/knob. To tighten the thread tension, simply turn the knob/screw to a bigger number. To relax the thread tension, move to a lower number. You can test out the tension on a scrap piece of fabric to find the best-looking stitch for your machine.
This didn’t work? Clean your thread tension discs.
The thread tension knob/screw is attached to two discs, which come together or go apart to adjust the thread tension.
- Reduce the thread tension down to 0.
- Get a microfiber cloth
- Put rubbing alcohol on the microfiber cloth
- Slide the microfiber cloth thru the thread tension discs to clean them
These steps will ensure your thread tension assembly is free of dust and dirt to create even stitches and zero birds nest under your fabric.
Next, check out your bottom thread tension.
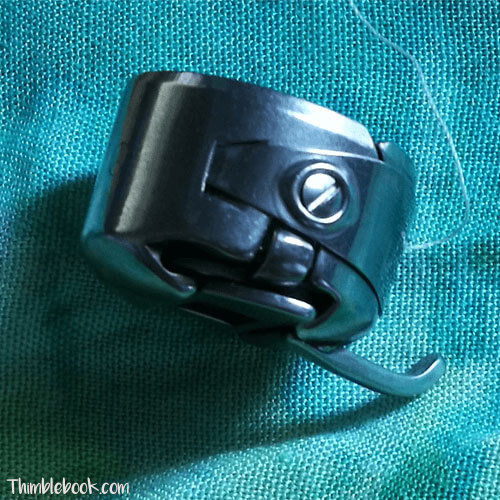
I can only assume you have a Japanese class 15 sewing machine. Japanese class 15 sewing machines have a metal bobbin case. When you put the bobbin into the bobbin case and hold the thread like a yo-yo, the thread is supposed to slowly unwind.
However, when the thread tension is too loose, the bobbin will fall to the ground soon as you grab hold to the thread. To fix this problem, tighten the screw on the side of your bobbin case until you get the thread to unwind slow.
You can have the opposite problem too. When the thread tension is too tight, the bobbin won’t go anywhere. To fix this problem, simply loosen the screw on the side of your bobbin case until you get the thread to unwind slow.
Is your bobbin case crazy?
A crazy bobbin case has a screw that won’t loosen or tighten. Or, the bobbin case itself is damaged or warped in some way. When your bobbin case is crazy, always buy a new one. They don’t cost much. Here is a link to bobbin cases.
Still not working? Make sure your thread works.
Check out the bobbin case thread to make sure there are no knots in your thread.
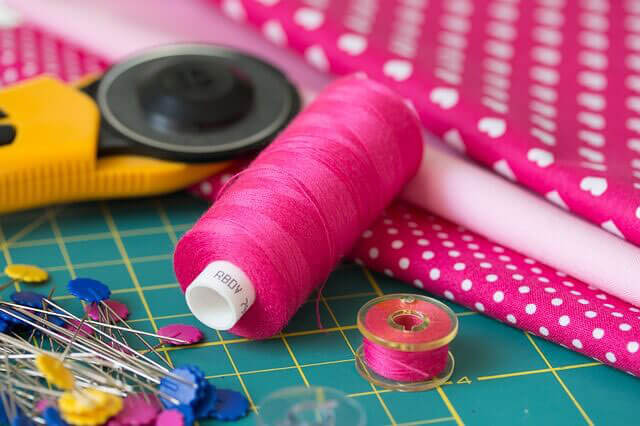
No knots in your thread? Check the quality of the thread itself.
Is your thread high quality or that cheap stuff from the dollar store? You’ll want to make sure your thread quality is good. Also, make sure your sewing machine likes the thread you are using. My sewing machine doesn’t like certain types of threads. You just try different brands and types until you get a good fit. I buy gutermann thread.
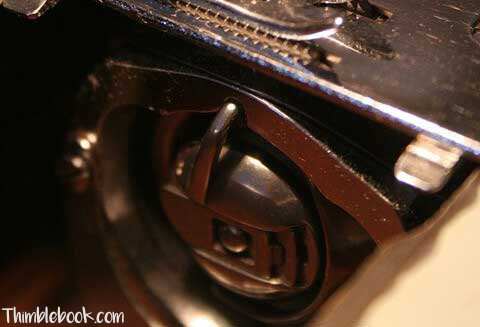
Last ditch effort. Take the needle plate off and clean underneath the hood.
A dirty machine will disrupt the sewing process and cause serious problems with sewing. Take a good brush and clean out your shuttle area. Also, make sure to oil your machine as recommended in your sewing machine manual.
When all else fails, send your sewing machine to a repair shop.
I know we don’t like to hear the word “repair.” However, when you don’t have the expertise to fix the thread loops under fabric problem yourself, it’s always better to take the machine to someone who knows what they are doing. Of course, the last thing you want to do is make the problem worse than it already is.
Other helpful articles:
6 Comments
Leave a response
Hope you don’t mind if I add a few other possibilities:
1.) On most older/vintage machines, before you begin stitching, you need to raise the presser foot, gently pull the upper thread straight back behind it for a few inches, lower the needle with the balance wheel so it catches the bobbin thread and pulls it back up. Pull the bobbin thread to the back along with the top thread, then put your fabric under the needle, lower the presser foot and begin sewing slowly about 1/4″ from the fabric edge while holding a slight tension on the 2 threads. Once the fabric is moving consistently, release the threads and you’re good to go. This is not always the cause but it can happen, particularly with thinner, lightweight materials.
2.) If your machine is a zig-zag model, are you straight stitching? If so, are you using a straight stitch foot? Is the needle plate a zig-zag type or straight-stitch type? When straight stitching, it’s always best to use the correct foot and needle plate. If you are straight stitching with a zig-zag foot and zig-zag needle plate, the larger hole can allow fabric to be pulled down into the bobbin race as well as creating a thread nest. Not fun. Switch to a straight stitch foot and straight stitch needle plate.
3.) Using a light and a magnifying glass, examine the hook under your needle plate. If you are able to remove the race assembly (the thing that holds the bobbin in place), it will be easier. If you can’t, turn the wheel until you see the hook move around and stop it directly beneath the needle plate. Check carefully, and if you see any nicks in the hook, that might be your problem. If it’s metal, you might be able to smooth them out with an emery board or a Dremel if you’re very careful. If the bobbin race is plastic, it depends. I’ve had some success fixing plastic hooks the same way, but more often I’ve had to replace them. They can be a little pricey but at least they are available.
That was a great tip about using the dremel to smooth out nicks because those parts can get quite pricey. Thanks so much for your detailed response.
Oh, THANK YOU. What a relief.
You are very welcomed! By the way, I love the fiber art on your website 🙂
Some of the best info I’ve read after three hours of searching is on this site!
Thanks for visiting the website.