


How to Line Up Split Embroidery Designs
*This post may include affiliate links, which allow me to make a small commission off your purchases. The money is earned at no additional cost to you.
Are you interested in learning how to line up split embroidery design? Well, you’ve come to the right place. Below, you’ll find this tutorial along with a YouTube follow along video.
What is Needed?
For this tutorial, you will need:
- A file split into multiple parts for printing with the smaller hoop size (see tutorial)
- An embroidery machine
- Embroidery Hoops
- Medium weight tear away stabilizer
- 505 Temporary Spray Adhesive (optional)
Step 1: Stitch out the 1st part of the design.

Add medium tear away stabilizer to your fabric. Then, hoop your fabric within the embroidery hoop. Or, hoop the tear away stabilizer and use spray adhesive to float your fabric on top of the stabilizer. Once this is done, simply use your embroidery machine to print out the first embroidery design. Don’t forget to change the top thread to a bright color when your machine prompts you to print out the alignment stitches.
Step 2: Let’s simplify the tough part.
You’ve printed out the first file and alignment stitches. Now, it’s time to print out the other parts of the split design. Position your fabric in the general area of where the next part of the design needs to print.

Hoop the design
For this part, it will be easier to hoop your stabilizer and rest your fabric on top. To secure the fabric on top of your hoop, you can use temporary spray adhesive, painters tape, or a glue stick.
If you don’t have any of those items, you can simply hoop the stabilizer and fabric inside of the hoop. However, this should be a last resort.

These are the steps to printing from Brother SE625. End Edit, hit embroidery, touch the +/-, then hit the +1 to advance to the first stitch.
Set up the embroidery machine.
Once you’ve placed the embroidery hoop into your machine, select the part of your embroidery file that needs to print. Then, locate the stitch count and advance to the first stitch in your alignment line. Personally, I always set the horizontal axis to print first. So, my machine advances to the first stitch on the horizontal axis.
Does the sewing machine needle align with the alignment line from your first print?
Most likely, your printed alignment line will not be in perfect alignment with the sewing machine needle position. So, you will need to move the needle over until it matches.
Situations do arise!!
There are times when your sewing machine needle position cannot be moved any farther. In this case, you will need to re-hoop the design and start over.

This is how to advance to the 2nd axis on Brother SE625. Hit the + spool.
Once you have your alignment matched on the first axis. You’ll need to set the alignment for your second.
In my case, I lined up the horizontal axis first. So, I’ll be setting the vertical axis on this step. To reach the next axis on the alignment, you’ll need to advance the needle forward to the second object in your stitch window.
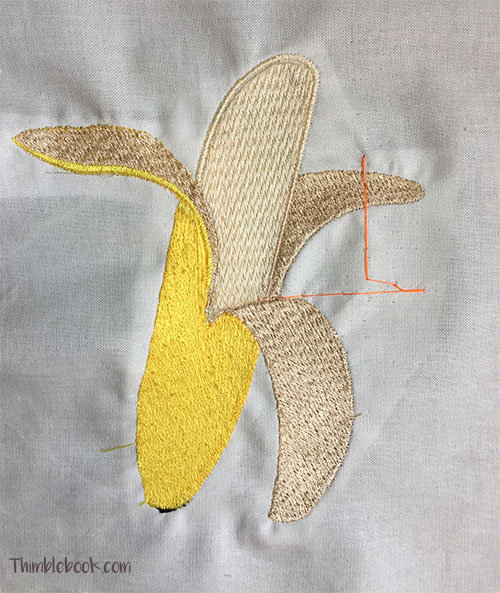
Now, align this stitch just as you did the first one.
Once you have the second axis alignment line together, remove the upper thread. Now, do a test print of the alignment lines. You should notice the sewing machine needle puncturing the alignment lines on your fabric. Now, you are ready to thread your machine with the appropriate color and stitch out the design. Repeat this entire alignment process to print out subsequent portions of the design.
I hope you enjoyed this tutorial on how to line up split embroidery designs.
No Comments