


How to Embroider Larger Than 4×4
*This post may include affiliate links, which allow me to make a small commission off your purchases. The money is earned at no additional cost to you.
Users , who own 4×4 embroidery machines, often become dissatisfied with the small embroidery window and want to go bigger. In this blog, you will learn how to embroider larger than 4×4 without having to spend money on a bigger machine. * There is more than one way to do this process! These are just the methods I found most useful.
I also have a YouTube follow along for this blog article. Check it out!
What will you need for this tutorial?
For this tutorial, you will need embroidery software for splitting your design into multiple documents. I will be using Embird Editor for this tutorial. However, any embroidery software with file splitting capabilities will work for this tutorial.
You may also wish to purchase a 5×7 hoop for embroidering designs on your 4×4 embroidery machine. Below, I have listed the aftermarket hoops used for my Brother SE625.
Which embroidery printing method should I use?
There are two different methods for printing larger.
The first method requires a 5×7 hoop.
If you decide to go with using a 5×7 hoop, you must first consider a few things.
- A 5×7 hoop will allow you print any design up to 7 inches long. However, due to the limitations of a 4×4 machine, you will never be able to make the design more than 4 inches wide. Generally, this means you will only be able to print a simple design that gets split into two separate parts.
- Since a 5×7 hoop is not designed for use on a 4×4 machine, the embroidery unit will get bruised by the forward motion of the hoop as your design gets stitched out.
Method #1
We will split the design into two parts and save each part as two different documents. Then, we will use the 5×7 hoop to print <doc1> and slide the same hoop down to print out <doc2>.
Method #1 : Step 1
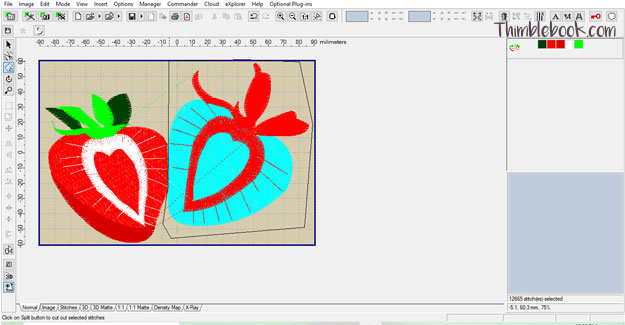
Hit <Edit> and <Center> <Both Axis>. Now, go to <Freehand select Mode> and outline your object.
Method #1 : Step 2
Use the <Split tool> in the upper right hand corner of the program to split this design into two separate parts.
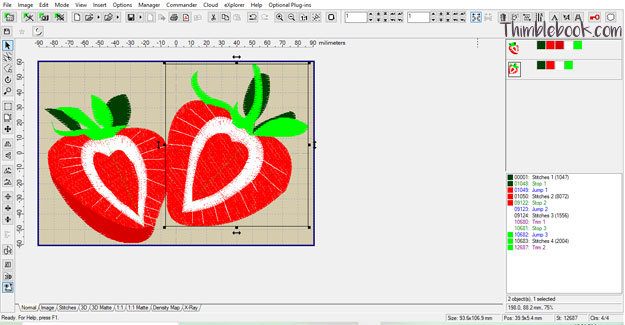
Method #1 : Step 3
Then, go to <File> <Save Separated As>. Afterwards, select your file size and hit <Ok> <Save>. It will save the file as two different documents you can then take over the the embroidery machine and print in the 5×7 hoop. To print, simply clip the 5×7 hoop into your embroidery machine at the top of the frame. Then, slide the hoop down to print out the second half of the design.
Method #2
The second method for how to embroider larger than 4×4 is very software involved and is most appropriate for:
- designs larger than 5×7
- complex designs
Method #2 : Step 1
For the second method, open the large embroidery design. In this instance, our design is 5×7.
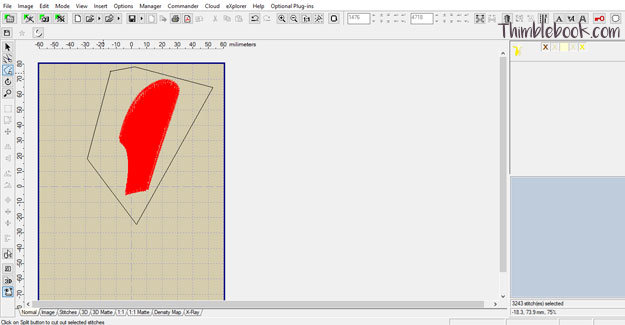
Method #2 : Step 2
Turn off all of the colors except for the color you would like to work with. Then, select <freehand select mode> and select the object. (It is the 3rd button down in your tool bar).
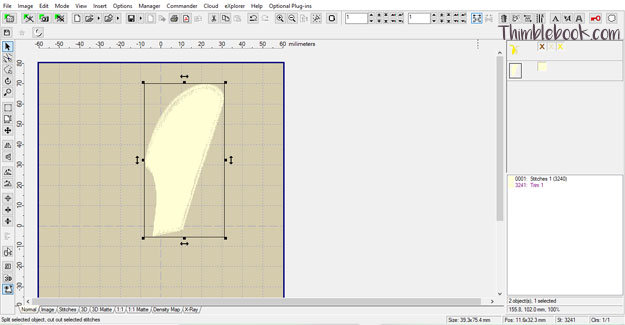
Method #2 : Step 3
Use the <split tool>, in the upper right hand corner of your screen, to split this portion of the design from the rest of your embroidery design. Then, rinse and repeat this step until you have enough 4×4 clippings to print the full design.
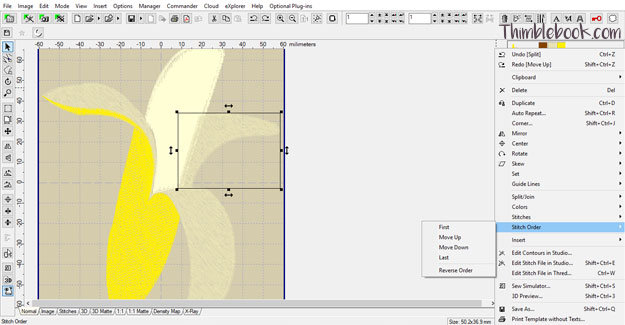
Method #2 : Step 4
Some designs, have multiple layers (one layer prints on top of the other). To re-organize these layers, right click on the layer and select <stitch order>. You may click <move up>,<move down>, <last>, or <first> to organize your layers in the correct order.
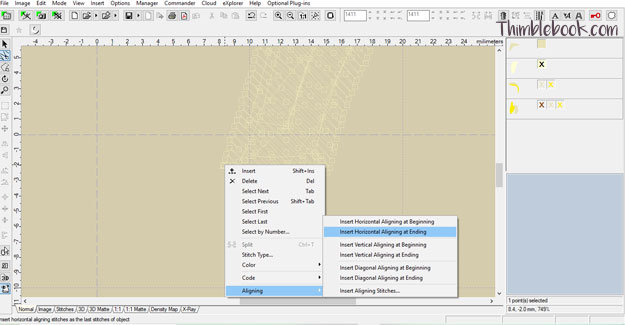
Method #2 : Step 5
Now, we need to add alignment lines. The alignment lines will allow us to properly align each 4×4 printing when we take it over to the embroidery machine. To create the alignment lines, turn off all the colors except for the object you wish to print first. Then, select <points editing mode> and click on a point inside of the object. Right click and select <Align>. Then, select <Insert horizontal alignment at end>. Last, select another point on the object and select <Insert vertical alignment at end>.

For all of the subsequent layers, you’ll want to add alignment lines by selecting < Insert vertical/horizontal alignment at beginning>. Then, you will need to move the new alignment lines into the same position as the ones we created for the first layer. This way, all of the alignment lines end up in the exact same space.
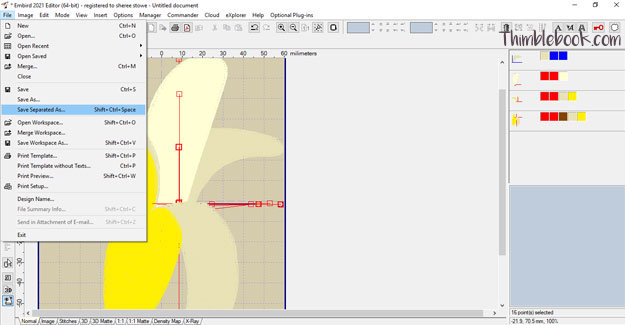
Method #2: Step 6
Go up to <File> and click <save separated as>.
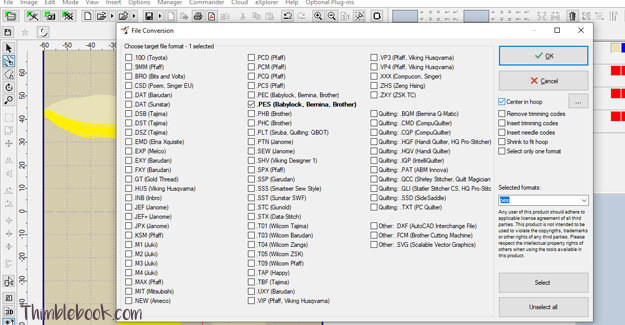
Method #2: Step 7
Find your 100 x 100 file type. In this case, the Brother file type is under standard 1. Follow the prompts. When you get to the file conversion section, make sure <center in hoop> is selected. Click <OK>. Hit <Save>. You will now see a prompt asking you if you would like all files to use the same file name. Select <No> and select the document name you would like to use. Your design will automatically save into multiple split sections. Now, you are ready to take your design over to the embroidery machine.
Other Helpful Articles
Brother SE625 Embroidery Machine: An Honest Review
How to Embroider on a Backpack Using a 4×4 Single Needle Machine
No Comments